Die Entwicklung von Prozessoren (CPUs) ist eine beeindruckende Erfolgsgeschichte. Vom Intel 4004 im Jahr 1971 bis zu den modernen Intel Core-Prozessoren der 10. Generation haben CPUs in nur 50 Jahren enorme Fortschritte in Geschwindigkeit und Rechenleistung gemacht. Aufgaben, die früher Supercomputer überforderten, meistert heute ein günstiges Smartphone. Selbst einfache Laptops sind hundertmal leistungsfähiger als die Computer der Apollo-Missionen. Doch Multi-Core-Prozessoren mit 4, 8, 16 oder sogar 32 Kernen verwirren viele Nutzer noch immer. Hersteller wie Intel und AMD werben damit – aber was bringt das wirklich?
Was sind Prozessorkerne?
Ein Prozessorkern ist eine eigenständige Verarbeitungseinheit auf dem CPU-Chip. Jeder Kern verfügt über eigene Hardware, Cache-Speicher und teilt sich den Systemspeicher sowie den Bus mit den anderen Kernen. Im Kern ist jeder Kern eine komplette CPU – ein Multi-Core-Prozessor vereint also mehrere CPUs auf einem Chip, die parallel arbeiten. Der Vorteil: Rechenaufgaben lassen sich aufteilen, was Zeit und Energie spart.
Die Wirksamkeit hängt vom Betriebssystem und der Software ab. Früher nutzten viele Programme nur einen Kern. Heute unterstützen moderne Systeme wie Windows und ressourcenintensive Anwendungen (z. B. Adobe Premiere) alle Kerne optimal – für spürbar schnellere Ergebnisse.

Multi-Core-CPUs starteten 2001 mit dem IBM Power4 (zwei Kerne). Die Software folgte erst später: Windows XP brachte ab 2001 Unterstützung. Heute profitieren alle anspruchsvollen Programme von Ihren Kernen.
(Mehr Infos: Detaillierter Artikel zu Multi-Core. Beim PC-Kauf: Worauf bei CPUs achten. CPU-Geschichte: Hier entlang!)
CPU-Kerne in Windows aktivieren
Aus unserer jahrelangen Praxis bei TechJunkie: Multi-Core-CPUs laufen in neueren Windows-Versionen automatisch mit allen Kernen – vorausgesetzt, das BIOS/UEFI ist korrekt. Bei älteren Systemen wie Windows XP könnte eine BIOS-Anpassung nötig sein. Kernbegrenzung ist selten, nur bei Kompatibilitätsproblemen.
Kerneinstellungen in Windows 10
In Windows 10 nutzt das System standardmäßig alle Kerne. Begrenzen Sie sie nur bei Bedarf (z. B. Kompatibilität).
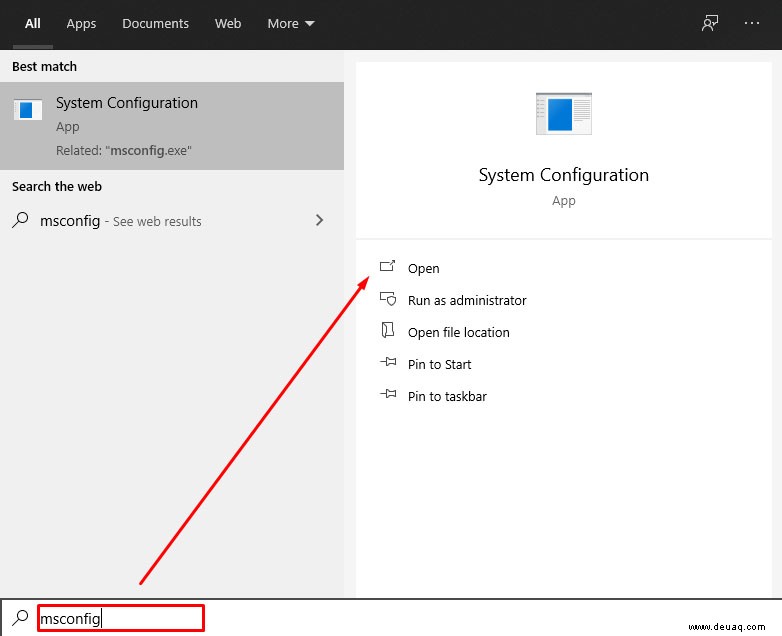
- Geben Sie ‘msconfig’ in die Windows-Suche ein und drücken Sie Enter.
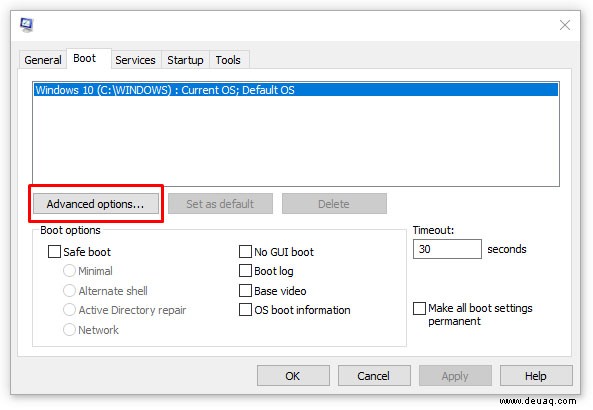
- Wählen Sie Reiter ‘Start’ und ‘Erweiterte Optionen’.
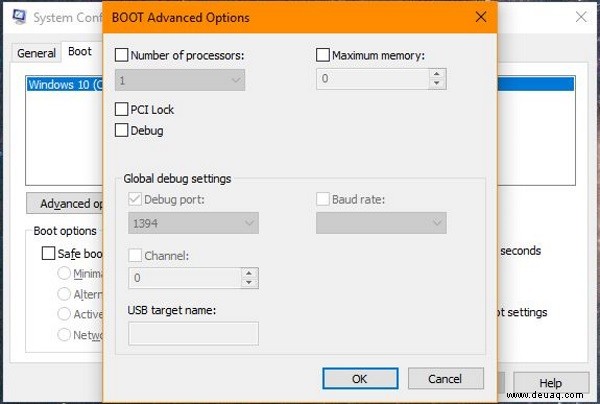
- Aktivieren Sie ‘Anzahl der Prozessoren’ und wählen Sie die gewünschte Kernzahl (z. B. 1 bei Problemen).

- OK und Anwenden.

Das Kästchen ist normalerweise deaktiviert – Windows nutzt alle Kerne bei Bedarf.
Kerneinstellungen in Windows Vista, 7 und 8
Gleicher Weg wie bei Windows 10 via msconfig. Zusätzlich: Prozessor-Affinität setzen, um Programme auf bestimmte Kerne zu fixieren – nützlich bei Stabilitätsproblemen.
- Strg + Shift + Esc für Task-Manager.

- Rechtsklick auf Programm > ‘Details’.

- Programm in Details erneut auswählen.
- Rechtsklick > ‘Affinität festlegen’.

- Kerne auswählen (Häkchen setzen/entfernen).

Bei Hyper-Threading (z. B. 4 physische + 4 logische Kerne bei i7) erscheinen doppelt so viele. Physische Kerne prüfen:
- Task-Manager (Strg + Shift + Esc).
- ‘Leistung’ > CPU.

- Unten rechts: ‘Kerngraphiken’.

Für Batch-Dateien zur Affinitätssteuerung:
- Notepad öffnen.

- ‘Start /affinity 1 PROGRAMM.exe’ eingeben (PROGRAMM ersetzen).

- Als .bat speichern.

- Ins Installationsverzeichnis legen.

- Batch-Datei starten.

‘affinity 1’ = CPU0 (siehe Microsoft-Developer-Seite für volle Liste).
Sollte ich alle Kerne in Windows 10 aktivieren?
Experten raten eindeutig: Ja! Gegenargumente (Stromverbrauch, Akkulaufzeit) halten wenig stand. Ein Core i7 verbraucht max. 130 Watt – weniger als ein Kühlschrank (250 W). Für Laptops: Underclocking spart effektiver Akku, ohne Kerne zu opfern.
Der Prozessor ist Ihr PCs Herz. Bei Leistungsproblemen: Upgrade erwägen oder Windows 10 optimieren.