Shutterfly ist ein großartiger Service, wenn Sie coole physische Fotobücher erstellen oder Bilder auf Tassen, Untersetzer, Magnete usw. drucken möchten. Außerdem ist es standardmäßig mit Google Fotos, Facebook und Instagram verbunden. Natürlich können Sie auch Bilder von Ihrem Smartphone verwenden.

Die folgenden Informationen geben Ihnen einen detaillierten Überblick darüber, wie Sie Google Fotos zu Shutterfly hinzufügen können. Außerdem gibt es einen speziellen Abschnitt zum Hinzufügen von Fotos über die Smartphone-App.
Hochladen von Fotos auf Shutterfly
Es gibt zwei Möglichkeiten, Bilder von Google Fotos oder einem anderen verknüpften Dienst/Gerät hinzuzufügen. Sie können ein bestimmtes Projekt auswählen (Karten, Drucke, Kalender usw.) oder Bilder direkt auf die Website hochladen. Folgendes müssen Sie tun.
Hinweis: Die folgenden Ratschläge gelten für Benutzer, die Shutterfly bereits geöffnet und sich bei ihren Konten angemeldet haben.
Meine Fotos hochladen
Klicken Sie nach dem Einloggen oben rechts auf Meine Fotos. Dadurch gelangen Sie zum Bildverwaltungsfenster, in dem Sie eine Vorschau aller Fotos, Alben und Erinnerungen anzeigen können. Um weitere Fotos hochzuladen, klicken Sie auf das Cloud-Symbol neben dem Suchfeld.

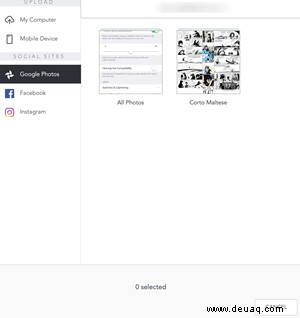
Unter dem Uploads-Fenster stehen fünf Optionen zur Auswahl. Klicken Sie auf Google Fotos und wählen Sie „Mit Google Fotos verbinden“, um Ihr Konto zu verknüpfen. Sobald Sie Shutterfly den Zugriff erlauben, sehen Sie alle Fotos und Alben nebeneinander.

Durchsuchen Sie Ihre Bilder, klicken Sie auf die Bilder, die Sie verwenden möchten, und klicken Sie auf die Schaltfläche Hochladen, wenn Sie fertig sind. Es dauert einige Sekunden, bis die Bilder hochgeladen sind und unter „Meine Fotos“ angezeigt werden.
Verwendung anderer Social-Media-Websites
Wie bei Google Fotos klicken Sie einfach auf Facebook oder Instagram, um Shutterfly den Zugriff zu gewähren, und wählen die hochzuladenden Fotos aus. Es ist erwähnenswert, dass Shutterfly den Zugriffs- und Überprüfungsprozess wirklich einfach gemacht hat. Sie sind nur zwei oder drei Klicks davon entfernt, jedes Social-Media-Konto zu verknüpfen.
Hochladen von Bildern von Ihrem Computer
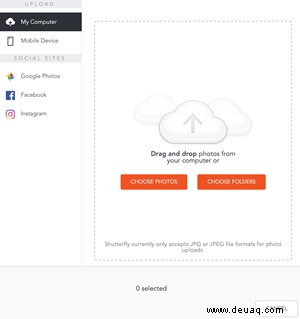
Mein Computer ist die erste Option unter Uploads zusammen mit den Schaltflächen „Fotos auswählen“ und „Ordner auswählen“. Diese bringen Sie zum lokalen Speicher, aber Sie müssen sich nicht um die Schaltflächen kümmern. Wählen Sie die Bilder oder Ordner aus, die Sie verwenden möchten, und ziehen Sie sie per Drag-and-Drop in das Fenster.

Wichtig ist, dass Shutterfly nur JPEG- oder JPG-Formate unterstützt, wenn Sie sie von Ihrem Computer hochladen. Mit anderen Worten, PNG- und RAW-Bilder sind ein No-Go, formatieren Sie die Fotos also unbedingt neu, bevor Sie sie hochladen.
Projekt-Uploads
Wenn Sie es eilig haben, brauchen Sie vorher keine Fotos hochzuladen. Wählen Sie ein neues Projekt und dann die Bilder aus. Wählen Sie ein bestimmtes Projekt/eine bestimmte Vorlage aus der Menüleiste und arbeiten Sie sich von dort aus vor.
Für die Zwecke dieses Artikels haben wir Socken aus der Kategorie Geschenke ausgewählt. Aber das Prinzip ist das gleiche für jede andere Option:Sie wählen einen Artikel aus, wählen eine Vorlage/ein Design, das Ihnen gefällt, und klicken auf Personalisieren. Letzteres kann abweichen, wenn Sie auch ein Paar individuelle Socken wünschen.
The Photos and “Add Photos” buttons are usually located at the bottom of the screen. Click on them and you’ll be taken to the Upload window. To add images from Google Photos, select this option under Social Sites, pick the images, and they’ll automatically be added to your project.
What’s more, you also get quick access to Recent Uploads, All Photos, Albums, and Arts Library.
A Side Note
The main Shutterfly highlights are the image search and sorting options. The search bar allows you to look for photos by name and you get to choose between small and large thumbnails. In addition, the “Sort by” menu makes it easy to switch between “Date Taken” and “Date Uploaded.” One of the things that Google Photos is yet to incorporate with their app.
How to Use the Shutterfly App
At first glance, the Shutterfly app doesn’t seem to connect with Google Photos and other linked sites/services. When you tap Photos, it displays images from your smartphone and the same thing happens when you tap Upload. But don’t write off the app just yet.
Select Store from the bottom left of the screen and choose one of the product categories. This time we’ve tested it with Shutterfly photo books. By default, the app opens Local Photos and there’s a small down arrow that reveals other connected services.

Tap on Google Photos and sign in to get access to the images. From there on, the process is the same as previously described. Tap on the photos to select them, hit the upload button, and the images will be incorporated with your project.
Shutterfly Memories
Both the app and the desktop Shutterfly feature a Memories tab which is similar, for example, to the one you get on Facebook. In a nutshell, Shutterfly keeps tabs on your uploads and analyzes the images to create memories.
These are image clusters based on location, people, or the date when taken. You can use them as inspiration for family photo books, calendars, and more.
Get the Custom Prints Going
When all is said and done, it’s super easy to add Google Photos to Shutterfly. Not only that, but you can also upload images from social media, your smartphone, or computer. Either way, the point is to get a physical memento that will highlight the image.
What Shutterfly items do you like the best? Did you consider using the service for business? Tell us more in the comments section below.