Heutzutage gibt es viele kostenlose Tools zum Erstellen benutzerdefinierter Klingeltöne mit einem Computer oder Mobilgerät. Einzigartige Klingeltöne eignen sich hervorragend zur Unterhaltung und Selbstdarstellung sowie zur Unterscheidung zwischen Anrufern. Wenn Sie einen Klingelton für Ihr Android-Gerät erstellen möchten, haben wir die Schritte in diesem Artikel beschrieben.
Wir zeigen Ihnen, wie Sie Ihren Klingelton mit beliebter kostenloser Software erstellen:AVCWare Ringtone Maker für Windows, GarageBand für macOS und RingDroid für Android OS. Außerdem erfahren Sie, wie Sie Ihren Klingelton für WhatsApp-Benachrichtigungen und -Anrufe einstellen.
Wie erstelle ich benutzerdefinierte Klingeltöne für ein Android-Gerät?
Das Erstellen benutzerdefinierter Klingeltöne aus Ihren bevorzugten Audio- oder Videoclips ist ein ziemlich einfacher Vorgang:
- Importieren Sie Ihren Clip in die Klingelton-Erstellungssoftware.
- Suchen Sie den gewünschten Abschnitt des Clips für Ihren Klingelton und kürzen Sie ihn nach Möglichkeit auf etwa 30 Sekunden. Kürzere Clips werden wiederholt und längere Clips werden nicht vollständig abgespielt.
- Übertragen Sie den Clip entweder per USB oder durch Hochladen auf ein Cloud-basiertes Konto in den Klingeltonordner Ihres Telefons.
- Suchen Sie den neuen Klingelton und legen Sie ihn als Standardklingelton auf Ihrem Telefon fest.
Nun zu den konkreten Schritten…
AVCWare Ringtone Maker (Windows)
AVCWare Ringtone Maker konvertiert Ton- und audiovisuelle Dateien in ein Klingeltonformat, das von den meisten Telefonmodellen unterstützt wird:
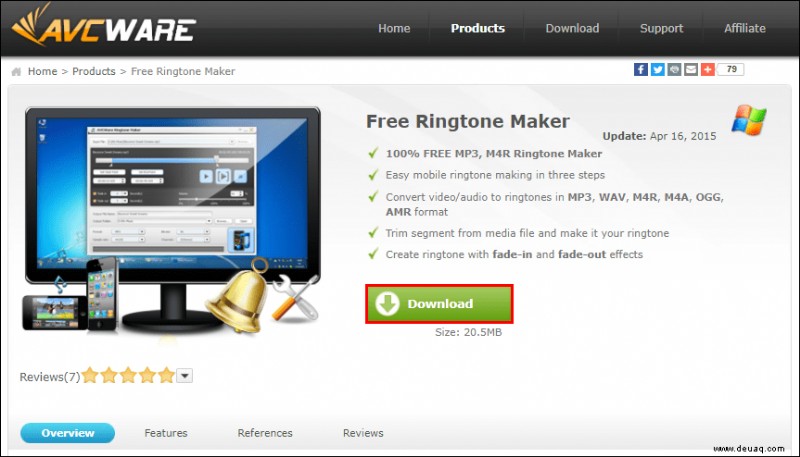
Laden Sie AVCWare Ringtone Maker über Ihren Computer herunter und installieren Sie es.
 Öffnen Sie das Programm, suchen und wählen Sie die Datei, die Sie konvertieren möchten, entweder durch:
 - Wählen Sie oben rechts „Durchsuchen“, um Ihre Computerdateien zu durchsuchen, oder
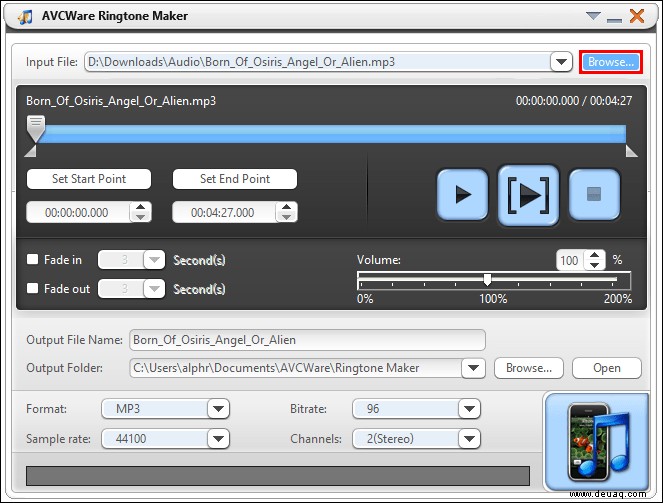
Verschieben der Datei auf die blaue Schaltfläche in Richtung der unteren rechten Ecke.
Wählen Sie im Dropdown-Menü „Format“ das gewünschte Format aus, z. B. MP3 oder WAV.
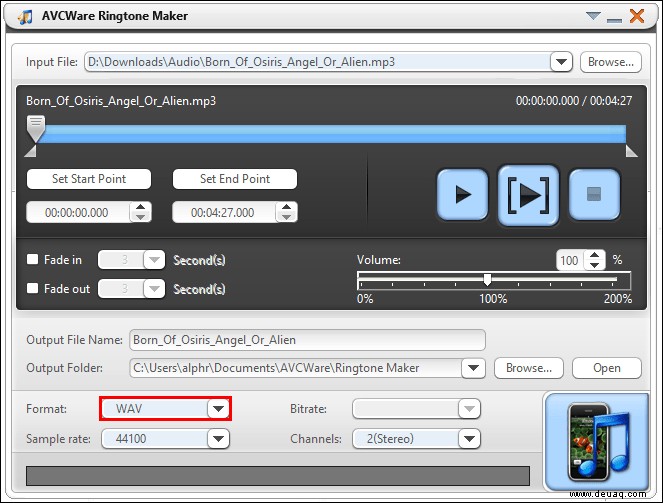
- Die anderen Einstellungen werden automatisch angepasst, um eine hohe Qualität zu gewährleisten.
Klicken Sie auf die Schaltfläche „Abspielen“, um Ihre Datei anzuhören und zu entscheiden, aus welchem Abschnitt Sie Ihren Klingelton erstellen möchten.
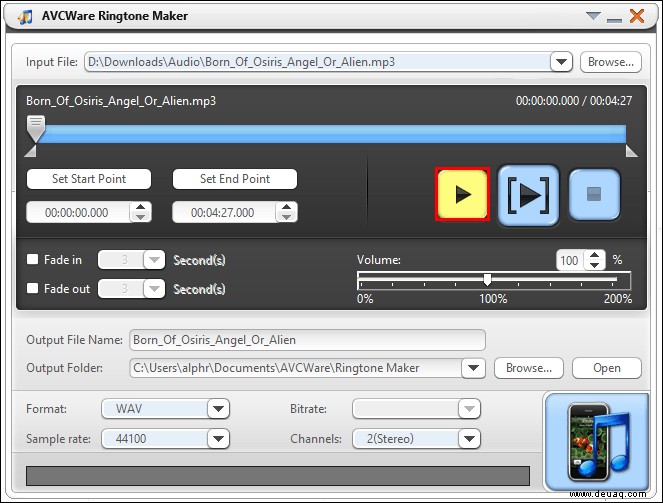 Verwenden Sie den Schieberegler, um Ihre bevorzugten Start- und Endpunkte zu verschieben.
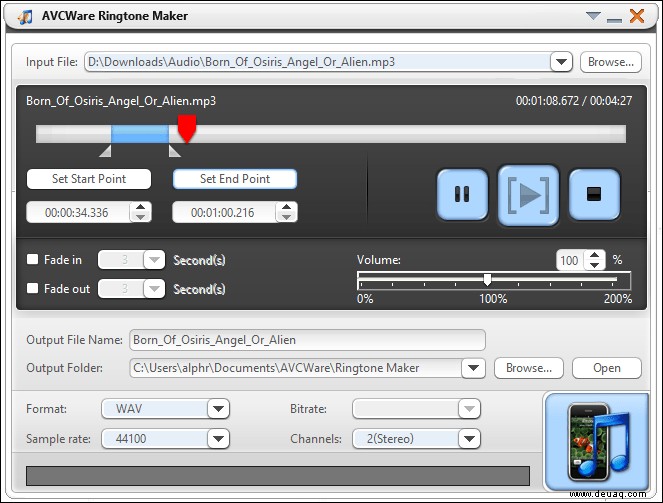 Um Ihren bearbeiteten Abschnitt anzuhören, klicken Sie auf die Schaltfläche „Play“.
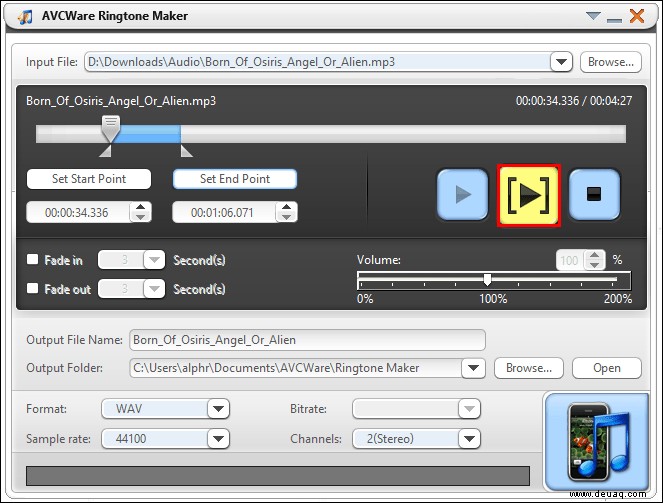
- Sie können den Schieberegler an neue Punkte verschieben, wenn Sie ihn bearbeiten möchten.
Um die Datei zu konvertieren, wählen Sie die Schaltfläche in der rechten unteren Ecke. Der Fortschrittsbalken zeigt 100 % an, sobald die Datei fertig ist.
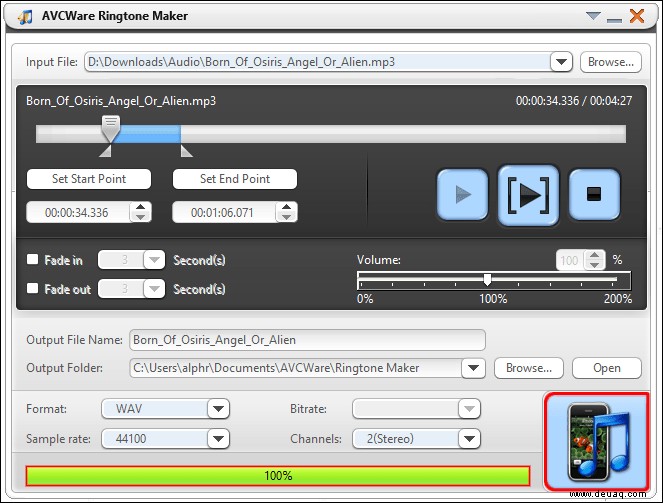
Übertragen Sie dann Ihren Klingelton auf Ihr Telefon:
Schließen Sie Ihr Telefon über ein USB-Kabel an Ihren Computer an.
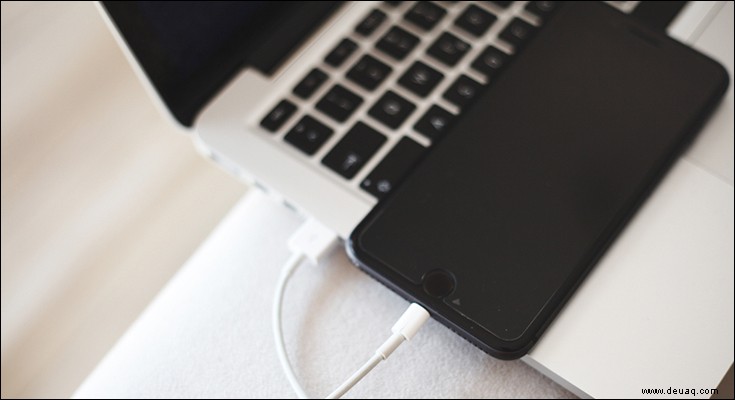 Sobald Ihr Computer Ihr Telefon abnimmt, navigieren Sie zum internen Speicher Ihres Telefons.
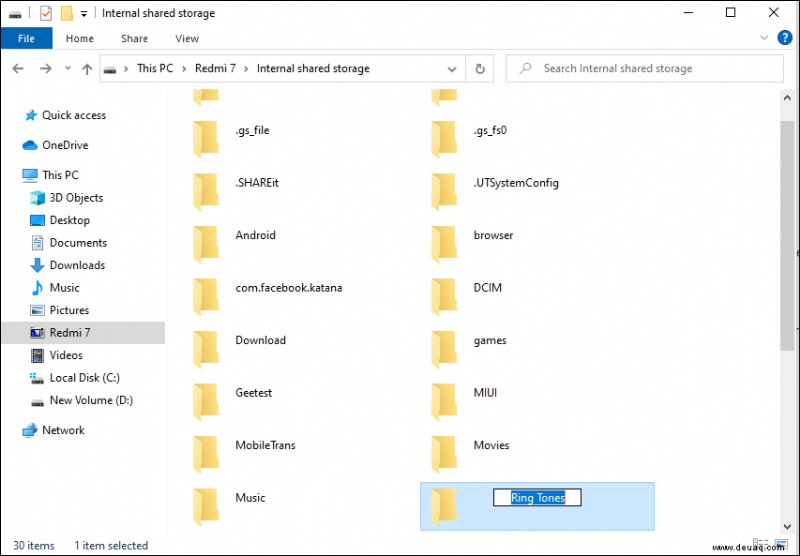
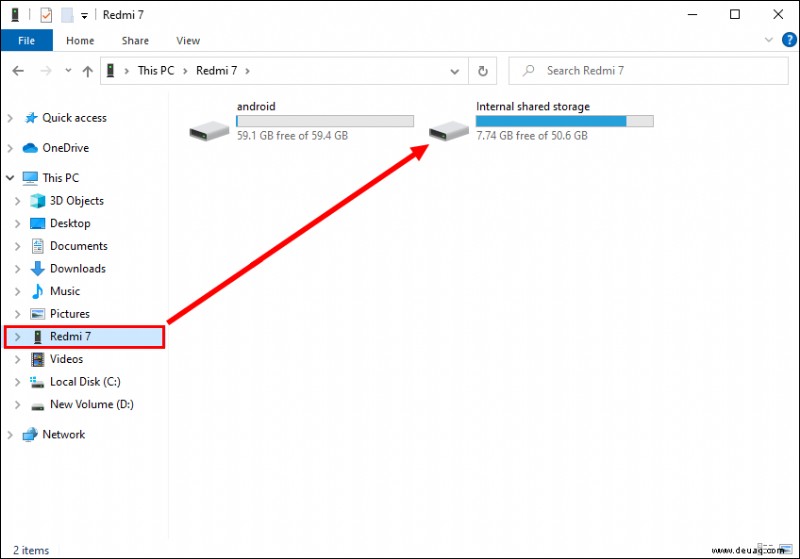 Greifen Sie auf Ihren Ordner „Klingeltöne“ zu. Wenn es keinen speziellen Ordner für Klingeltöne gibt, müssen Sie einen erstellen.
 Speichern Sie Ihren neu erstellten Klingelton im Ordner „Klingeltöne“ auf Ihrem Telefon.
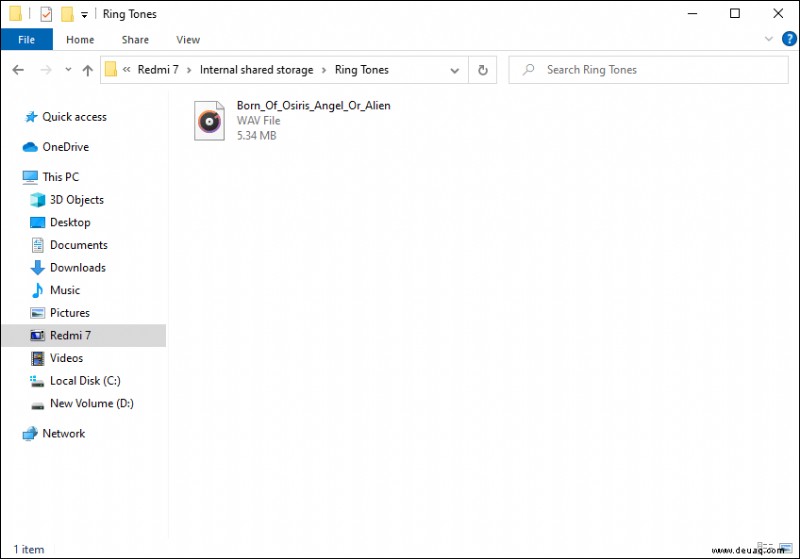
Hinweis :Alternativ können Sie Ihren Klingelton auf ein Cloud-basiertes Konto hochladen, wenn Sie eines wie OneDrive oder Google Drive haben, und es dann auf Ihr Android-Gerät herunterladen.
Legen Sie dann Ihren neuen Klingelton als Standard fest:
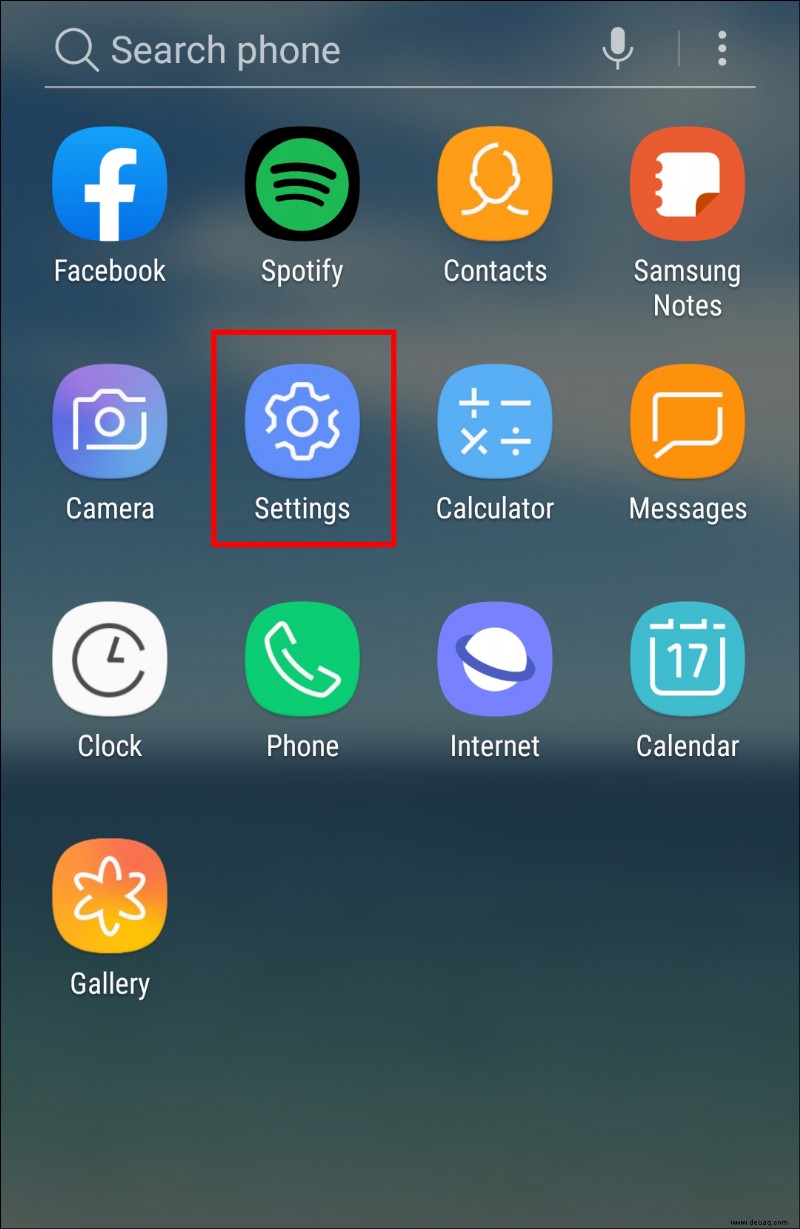
Starten Sie die App „Einstellungen“ über Ihr Android-Gerät.
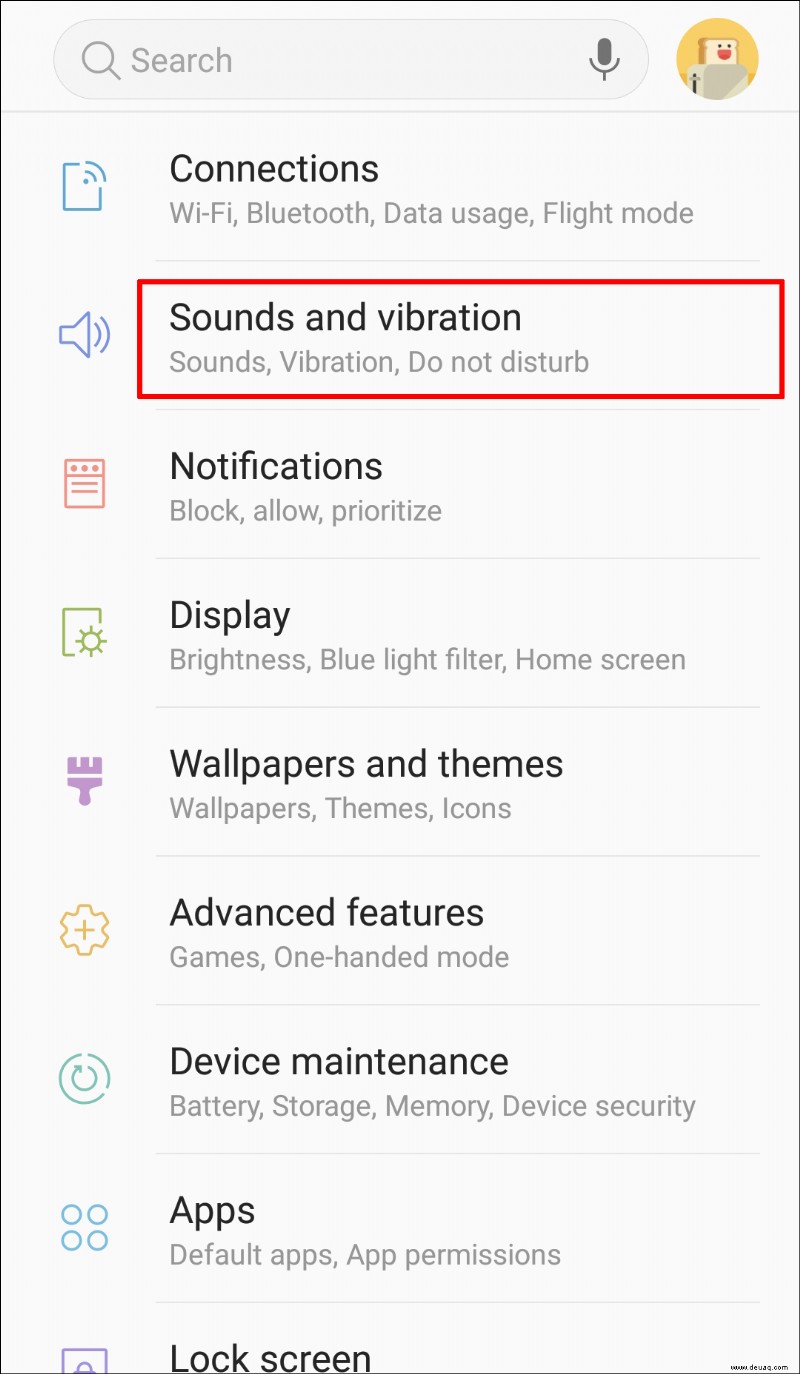
 Navigieren Sie zu „Sound &Vibration“.
 Klicken Sie auf „Erweitert“> „Telefonklingelton.“
Wählen Sie „Meine Töne.“
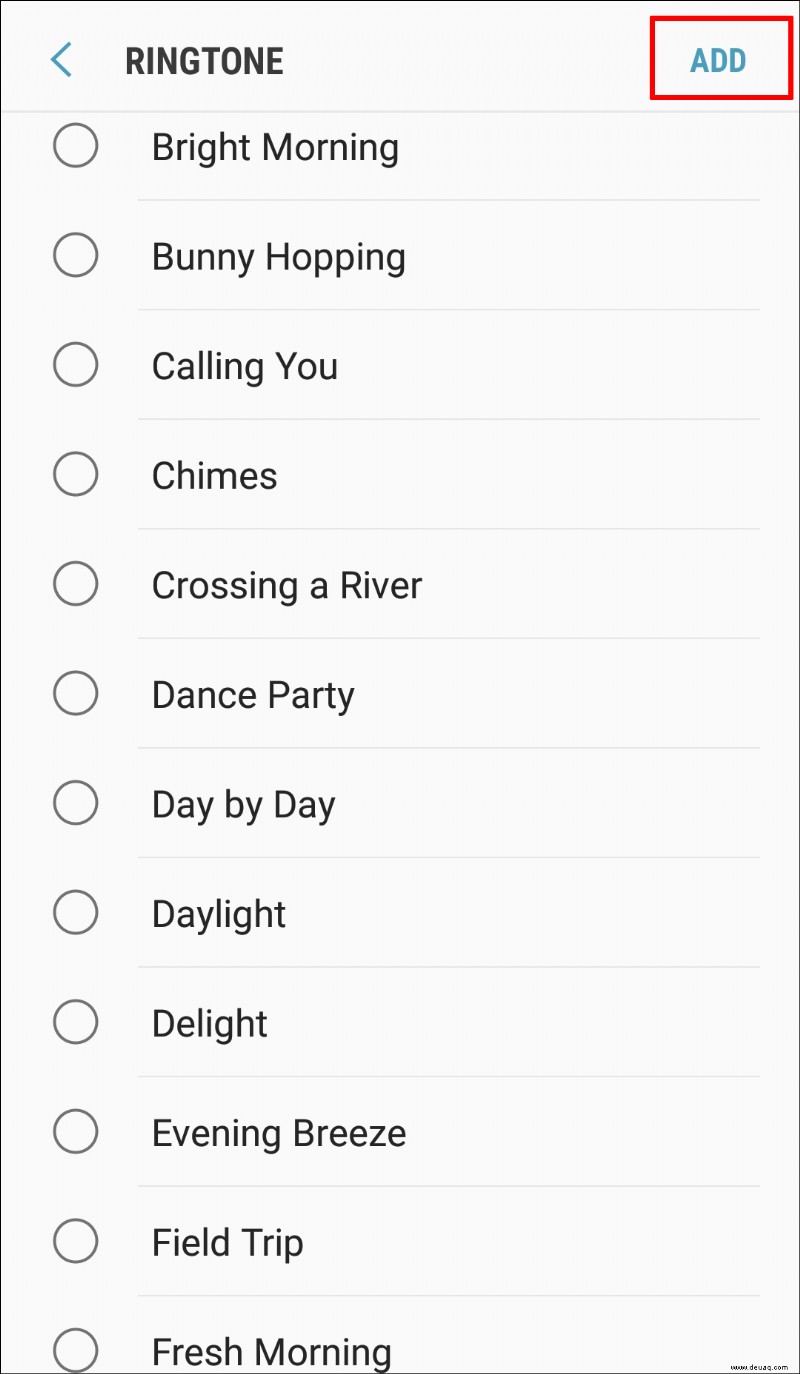
Wenn Ihr neuer Klingelton nicht aufgeführt ist, tippen Sie unten rechts auf die Schaltfläche mit dem Pluszeichen.
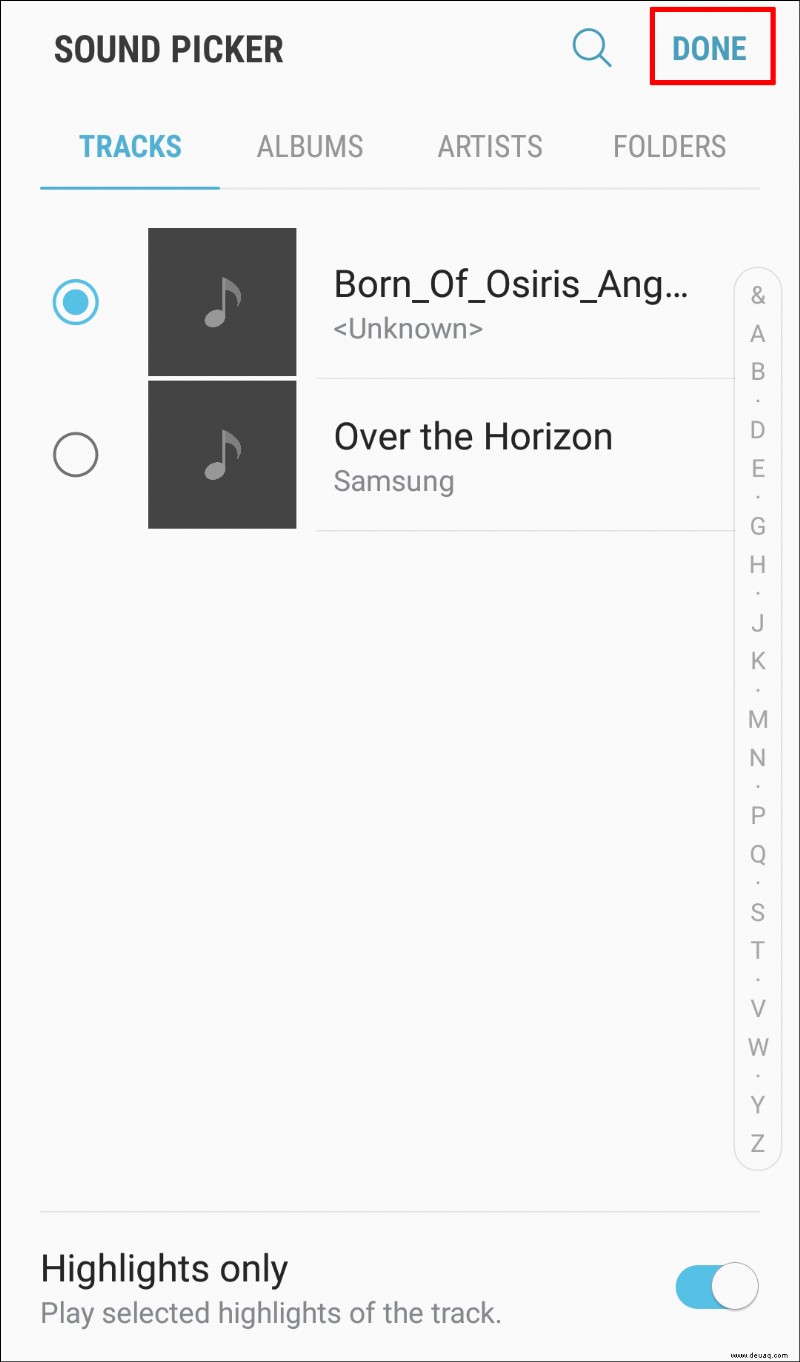
 Wenn Sie Ihren Klingelton gefunden haben, wählen Sie ihn aus und klicken Sie auf „Fertig“.
GarageBand (macOS)
GarageBand ist Apples kostenlose Anwendung zum Erstellen von Musik, die auf Apple-Produkten vorinstalliert ist. Es kann verwendet werden, um Klingeltöne für Android-Geräte zu erstellen:
Stellen Sie sicher, dass Sie die neueste Version von GarageBand installiert haben, und starten Sie dann GarageBand. - Standardmäßig wird ein neues Projekt mit hervorgehobenem „Leeres Projekt“ angezeigt.
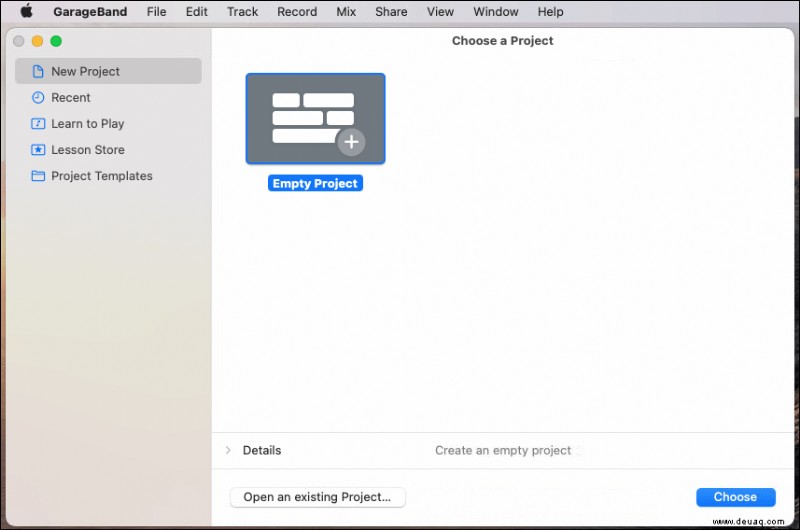
Wählen Sie „Auswählen“.
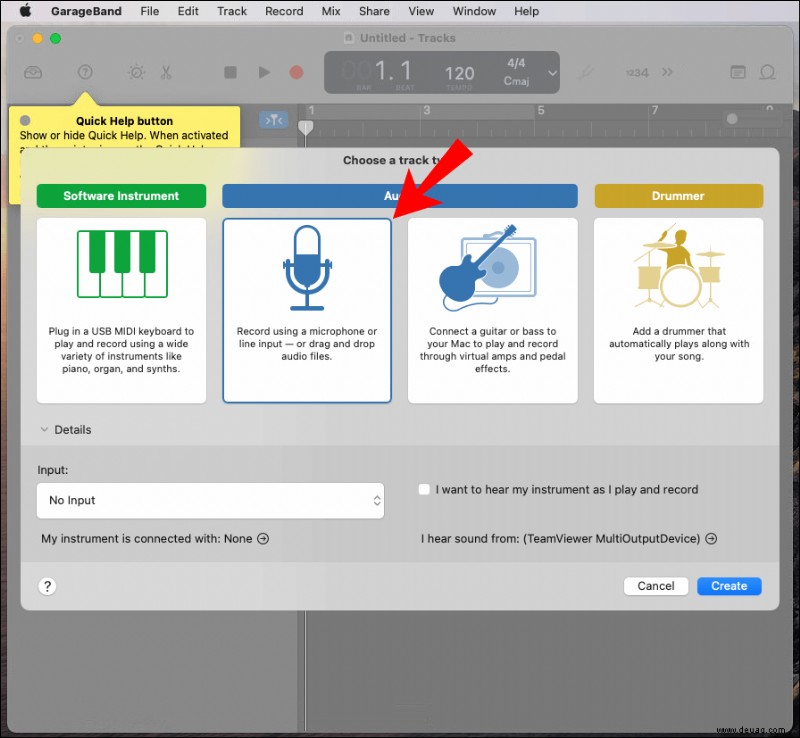
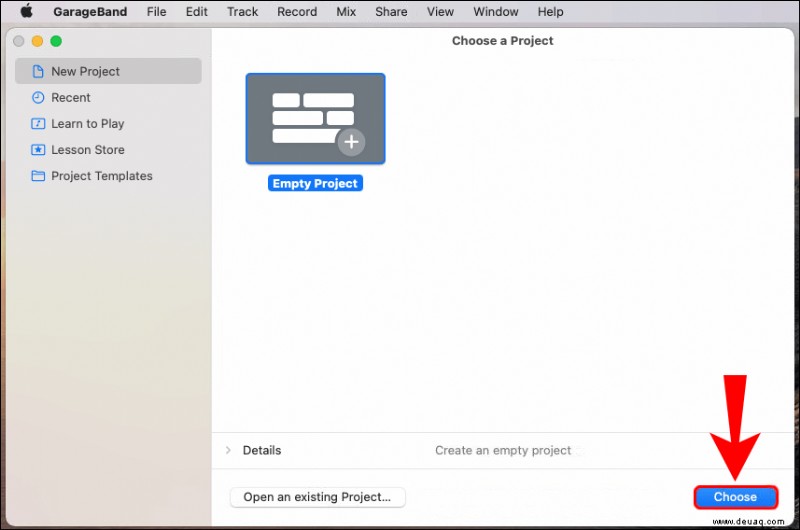 Wählen Sie im Popup-Fenster den Titel „Mikrofon“, um Ihre Audiodatei zu importieren.
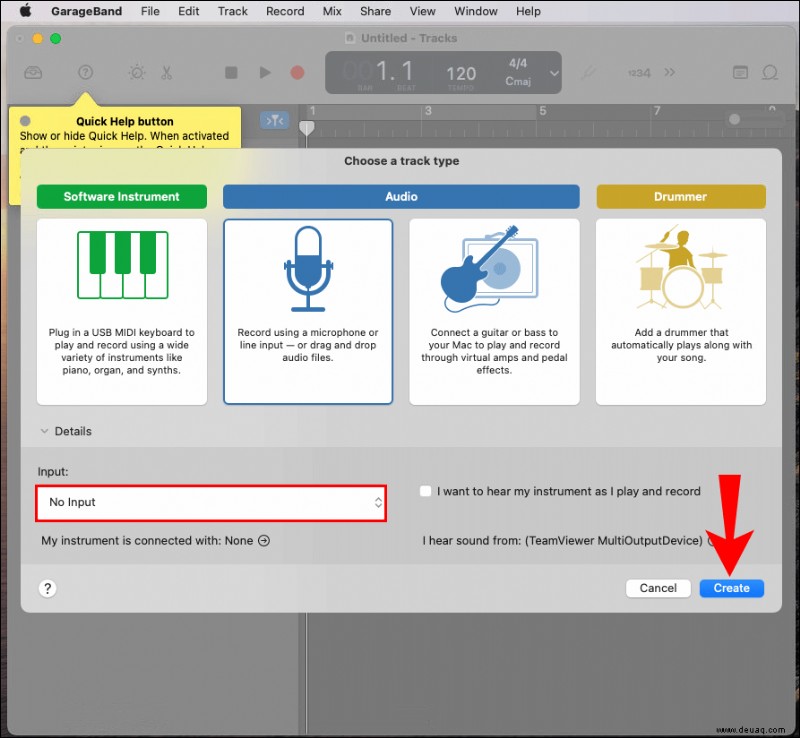
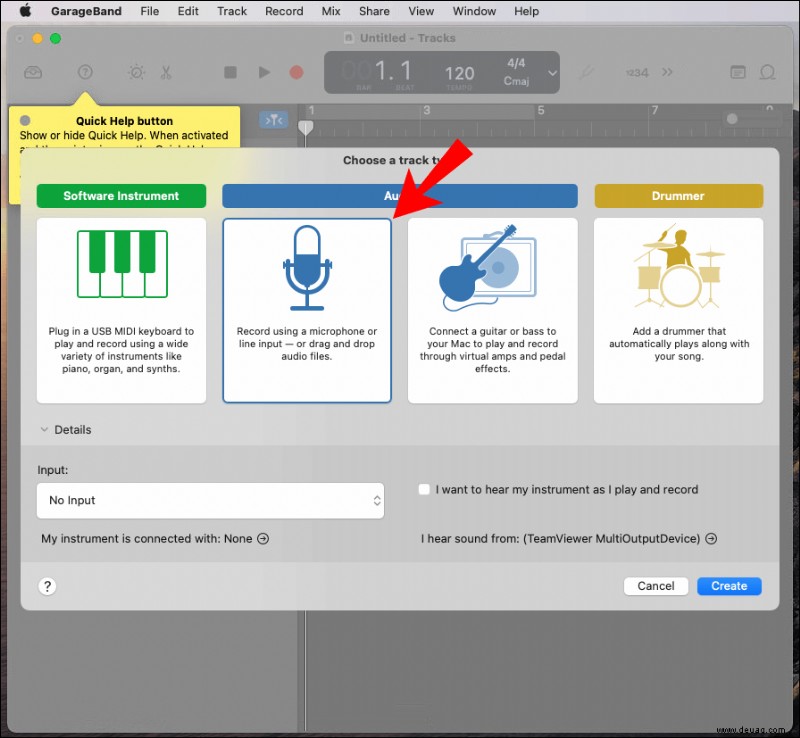 Stellen Sie sicher, dass „Keine Eingabe“ aktiviert ist, bevor Sie die Option „Erstellen“ auswählen.
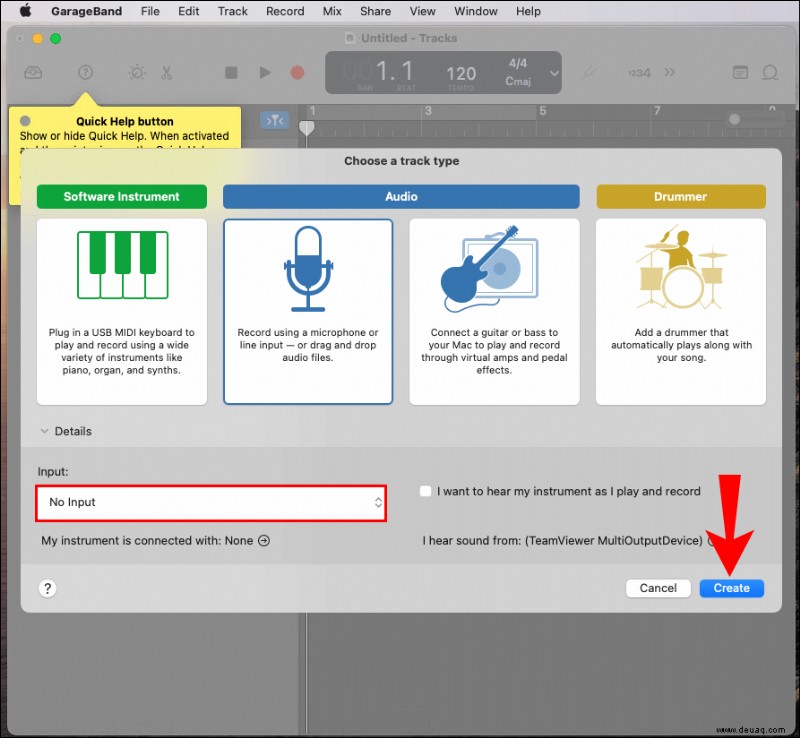 Starten Sie den Finder, um Ihren Track zu finden, und verschieben Sie ihn dann in GarageBand.
 - Es wird in den ersten Track geladen.
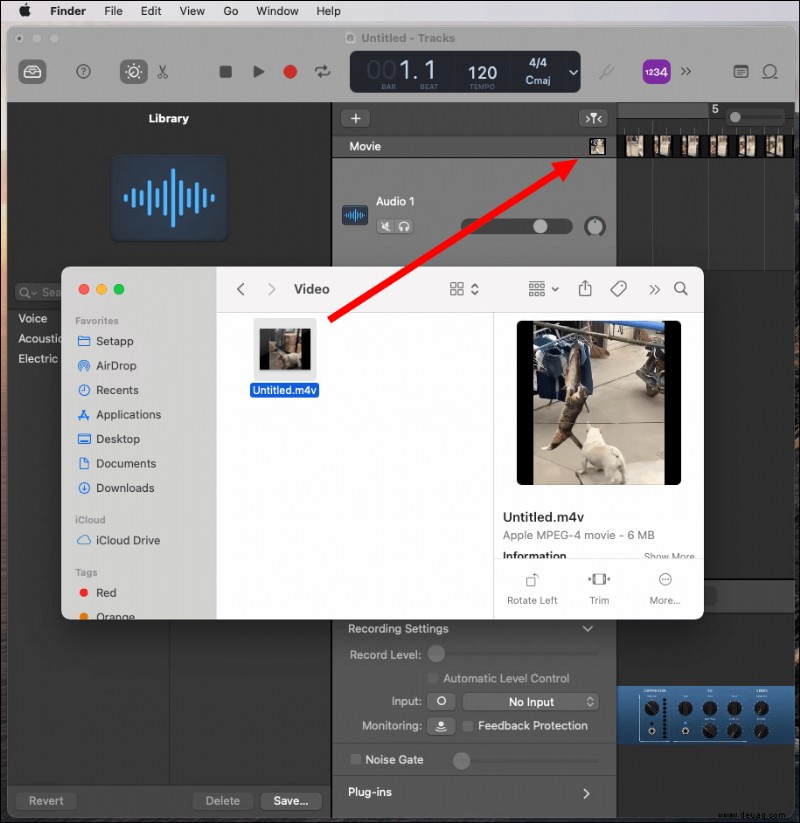
Klicken Sie rechts neben der Aufnahmesteuerung auf die Schaltfläche „Zyklus“. Lassen Sie es bis zum Abschluss eingeschaltet.
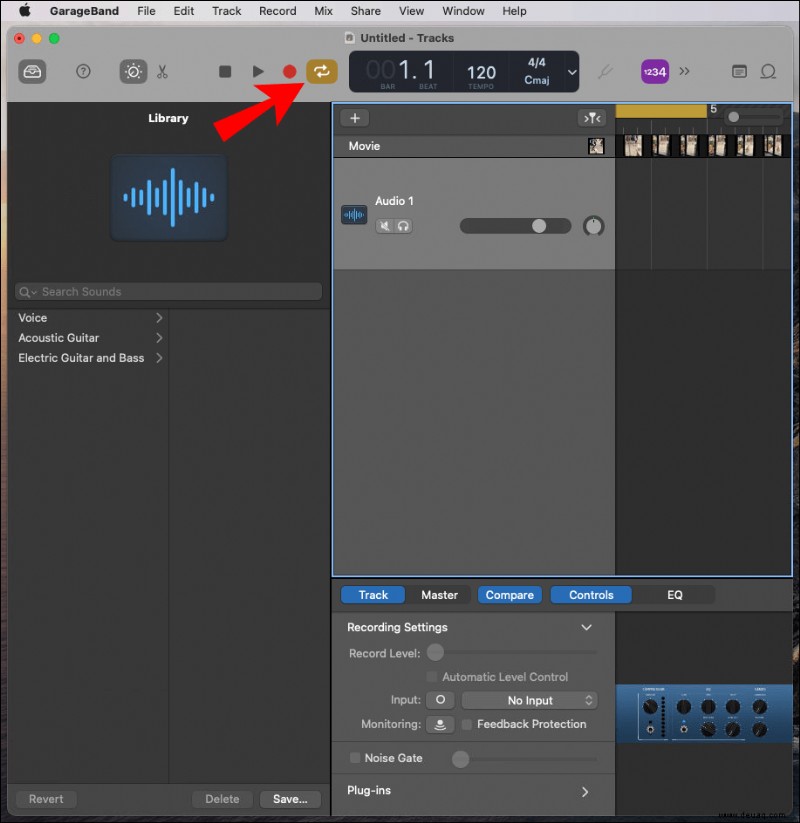 Bewegen Sie Ihre Maus über die gelbe Hervorhebung am linken Ende der nummerierten Zeile.
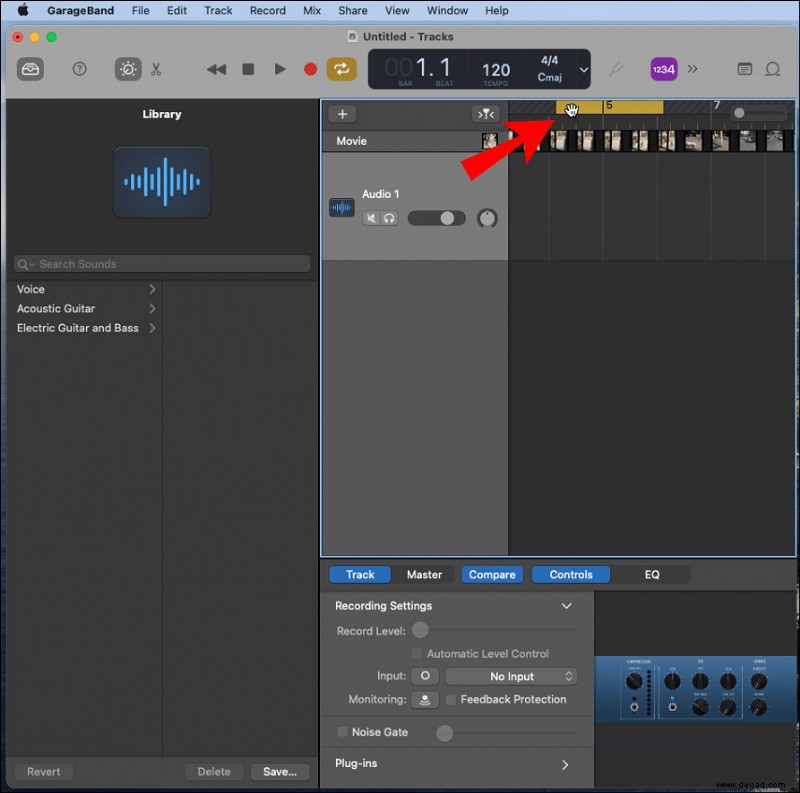 Um den Startpunkt Ihres Klingeltons festzulegen, bewegen Sie den Pfeil entsprechend nach rechts oder links; Wiederholen Sie auf der rechten Seite, um den Endpunkt zu fixieren.
 - Android-Klingeltöne laufen im Allgemeinen in 30-Sekunden- oder kürzeren Schleifen. Die Start- und Endpunkte des Zyklus sind gelb hervorgehoben.
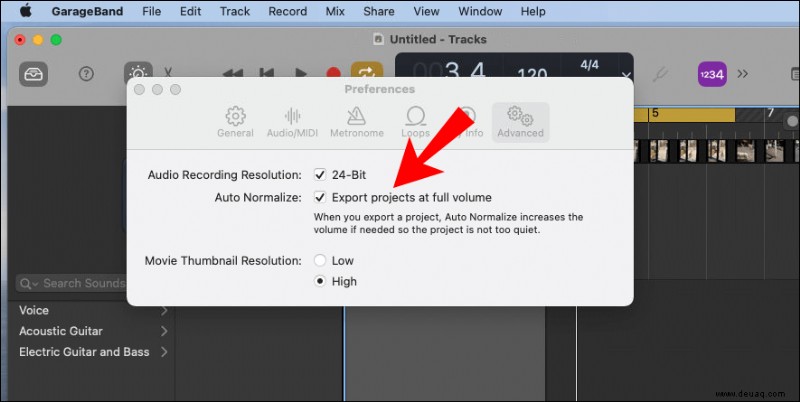
Klicken Sie im Menü auf „GarageBand“ und „Einstellungen“.
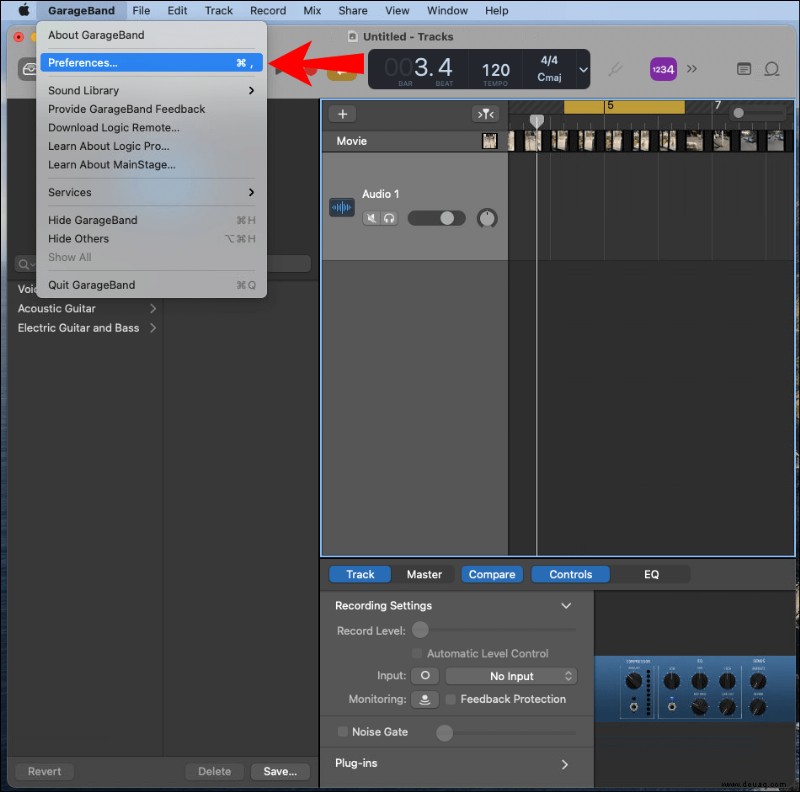 Wählen Sie „Erweitert“ und stellen Sie sicher, dass das Kästchen neben „Auto Normalize“ aktiviert ist.
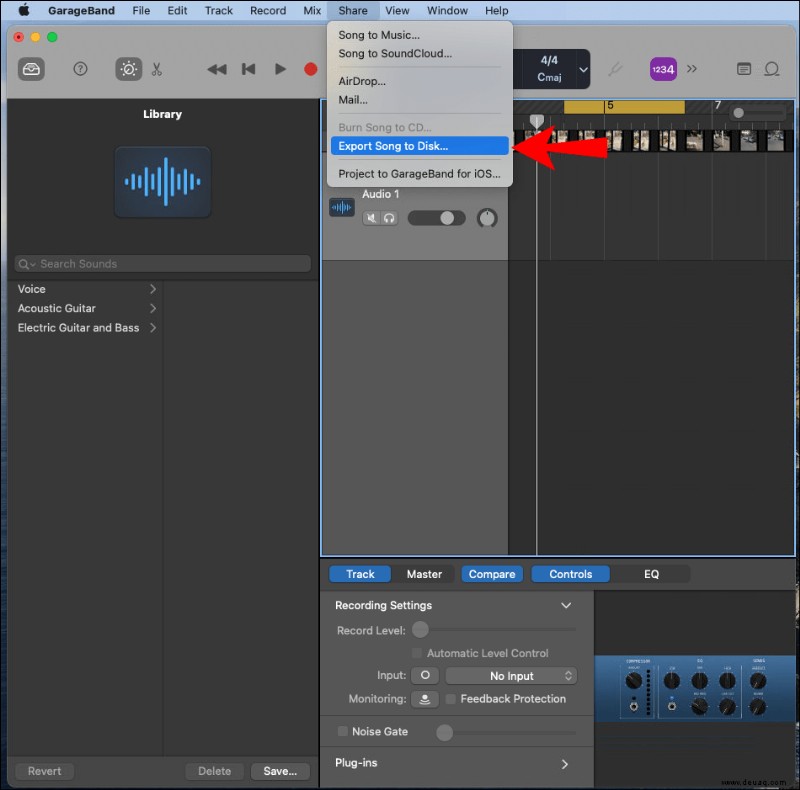
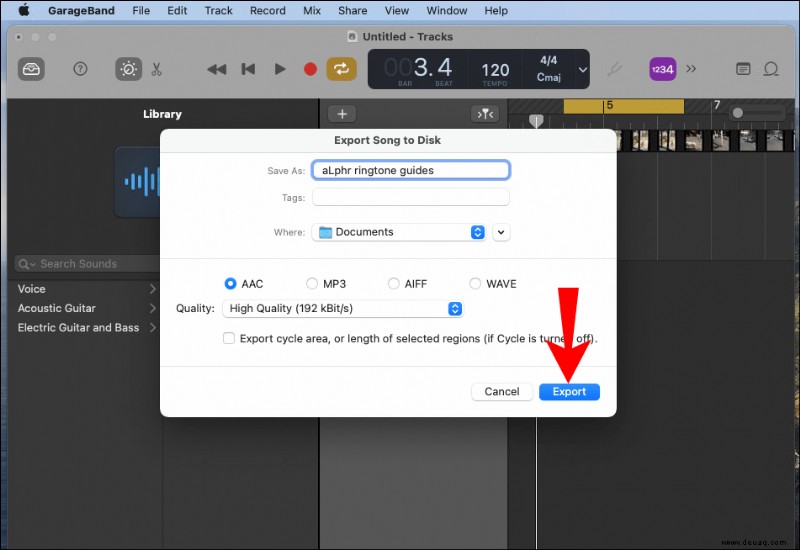
 Sobald Sie mit Ihrem Klingelton zufrieden sind, wählen Sie im Menü „Teilen“> „Song auf Festplatte exportieren“.
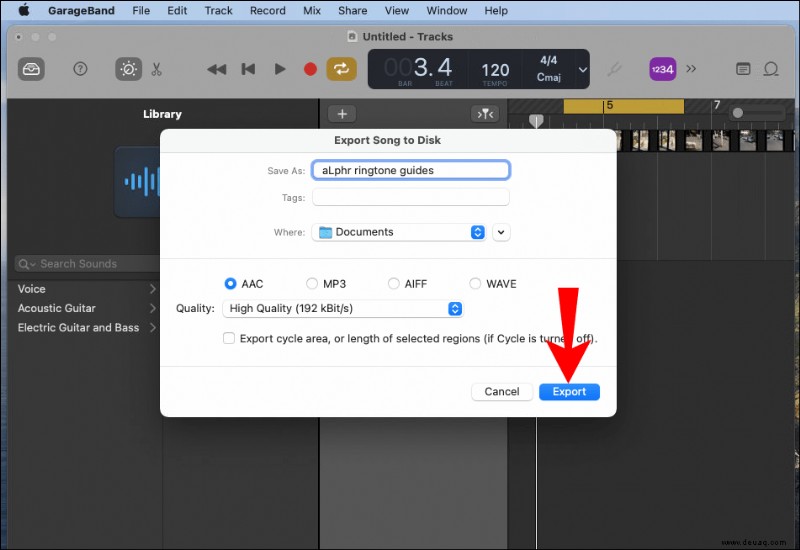
 Wählen Sie aus dem Popup einen Namen, ein Dateiformat, einen Speicherort und eine Qualität aus.
Wählen Sie zum Abschluss „Exportieren“ aus.
So übertragen Sie Ihren Klingelton auf Ihr Telefon:
Schließen Sie Ihr Telefon über ein USB-Kabel an Ihren Computer an.
Sobald Ihr Computer Ihr Telefon abnimmt, navigieren Sie zum internen Speicher Ihres Telefons.
Greifen Sie auf Ihren Ordner „Klingeltöne“ zu. Wenn es keinen speziellen Ordner für Klingeltöne gibt, müssen Sie einen erstellen.
Speichern Sie Ihren neu erstellten Klingelton im Ordner "Klingeltöne" auf Ihrem Telefon.
Hinweis :Alternatively, you could upload your ringtone to a cloud-based account if you have one like OneDrive or Google Drive, then download it to your Android device.
Then set your new ringtone as default:
Launch the “Settings” app via your Android device.
 Navigate to “Sound &vibration.”
 Click on “Advanced”> “Phone ringtone.”
Select “My Sounds.”
If your new ringtone isn’t listed, in the bottom-right corner, tap the plus sign button.
 Once you’ve found your ringtone, select it then “Done.”

RingDroid
RingDroid is a free open-source ringtone creation app for Android OS. To create your ringtone using RingDroid:
Ensure you have the latest version of RingDroid installed on your Android device.
Once opened, RingDroid will list all the available music on your phone. Use the search bar at the top or scroll through the list to find the song you wish to make a ringtone. - Try restarting the app if you can’t find your downloaded song.
Select the song by clicking on its title; then “Trim” to reduce the size.
Tweak the markers and choose the section of the song you want as the ringtone.
Once you’re happy with your selection, at the bottom-right, click on the download icon.
Give your ringtone a name then export it.
Then set your new ringtone as default:
Launch the “Settings” app via your Android device.
 Navigate to “Sound &vibration.”
 Click on “Advanced”> “Phone ringtone.”
Select “My Sounds.”
If your new ringtone isn’t listed, in the bottom-right corner, tap the plus sign button.
 Once you’ve found your ringtone, select it then “Done.”

How to Customize Ringtones for Contacts?
First, you’ll need to convert your track into a ringtone. Follow the steps listed below on how to do this using software for Windows and macOS.
Customize your ringtone using AVCWare Ringtone Maker for Windows:
Via your computer, download and install AVCWare Ringtone Maker.
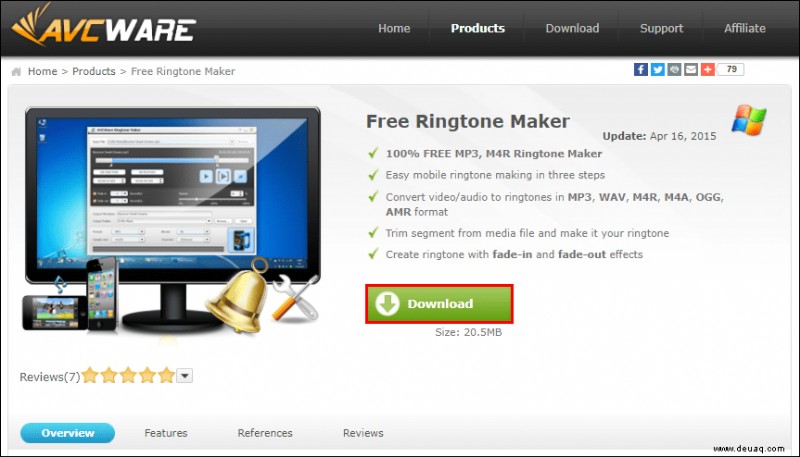 Open the program, then find and select the file you wish to convert by either:
 - Selecting “Browse” from the top-right to go through your computer files, or
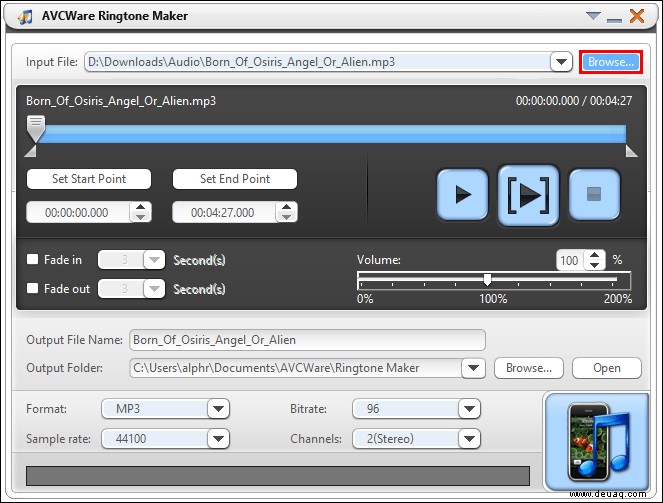
Moving the file onto the blue button towards the bottom-right corner.
At the “Format” drop-down, select the format you want e.g., MP3 or WAV.
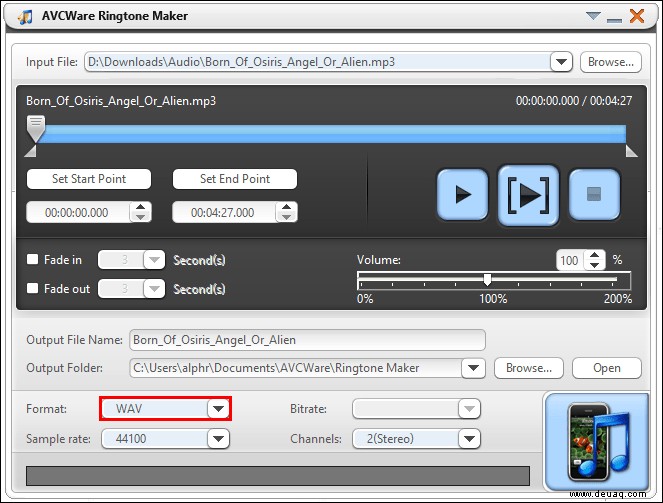
- The other settings will be automatically adjusted to ensure high quality.
Click on the “Play” button to hear your file and decide which section you’d like to create your ringtone from.
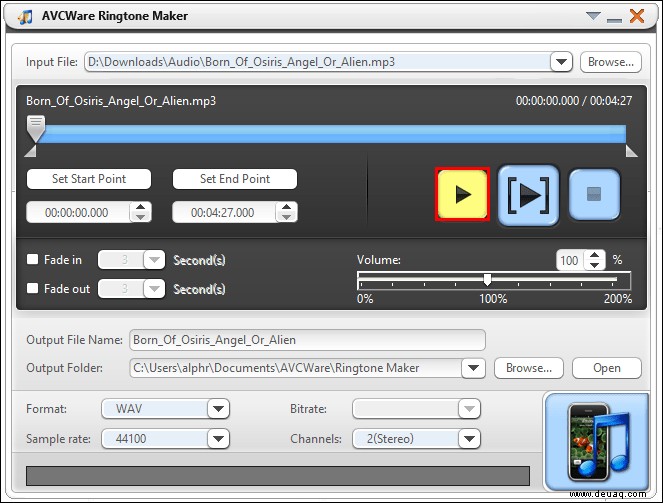 Use the slider to move to your preferred start and endpoints.
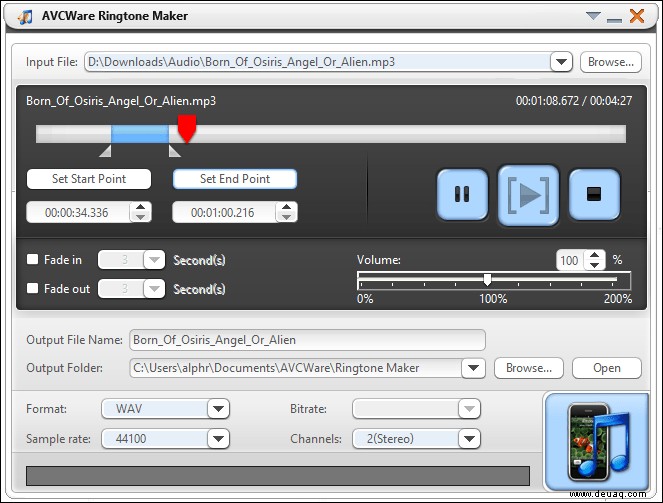 To listen to your edited section hit the “Play” button.
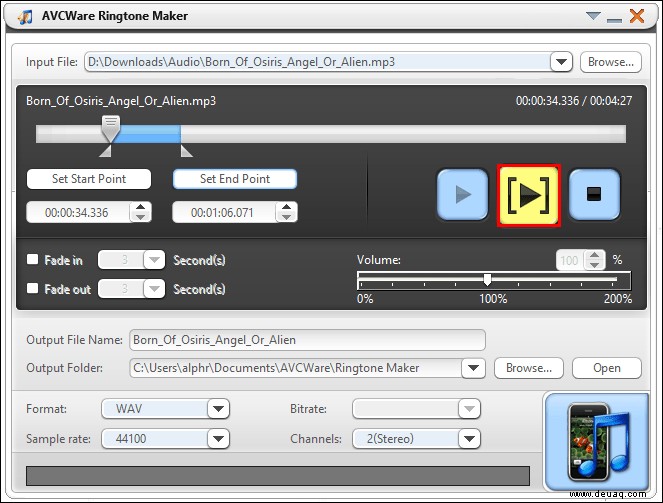
- You can move the slider to new points if you wish to edit it.
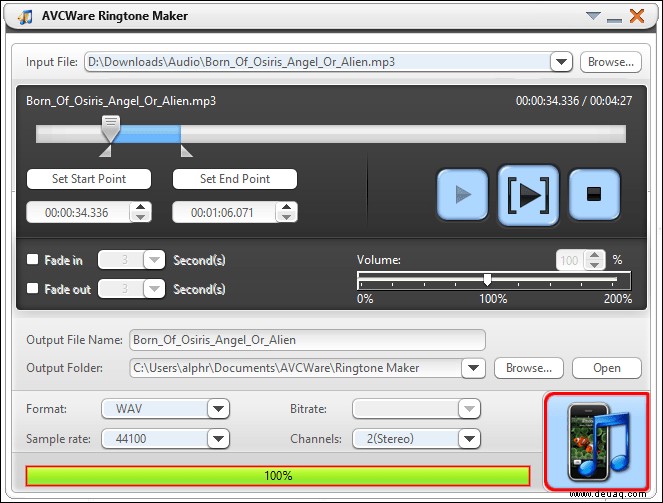
To convert the file, select the button towards the bottom-right corner. The progress bar will display 100% once the file is ready.
Customize your ringtone using GarageBand for macOS:
Ensure you have the latest version of GarageBand installed, then launch GarageBand. - By default, a new project is displayed with “Empty Project” highlighted.
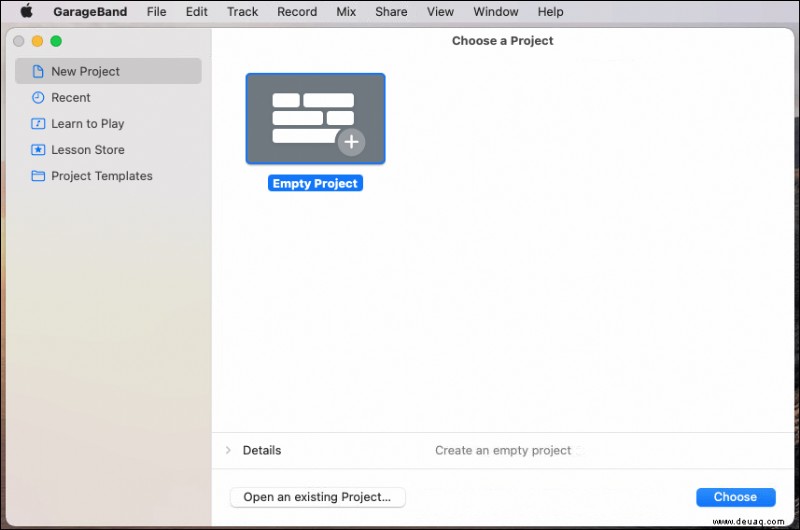
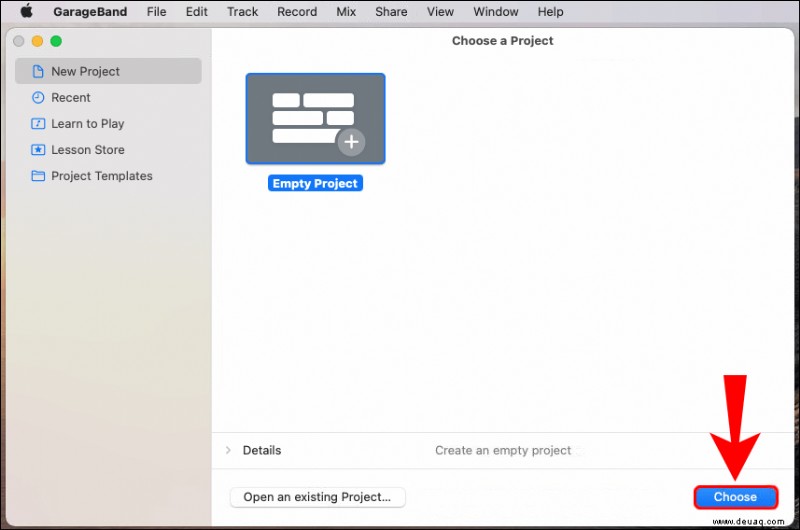
Select “Choose.”
 In the pop-up, select the “Microphone” title to import your audio file.
 Ensure “No Input” is enabled before selecting the “Create” option.
 Launch Finder to locate your track then move it into GarageBand.
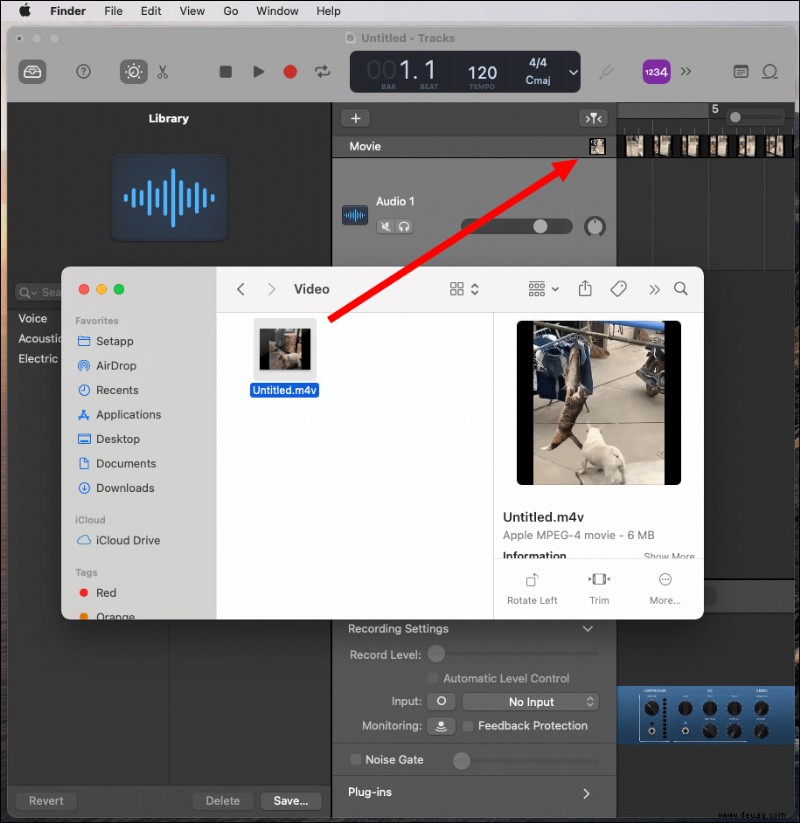
- It will load into the first track.
To the right of the record control, click the “Cycle” button. Leave it toggled ON until completion.
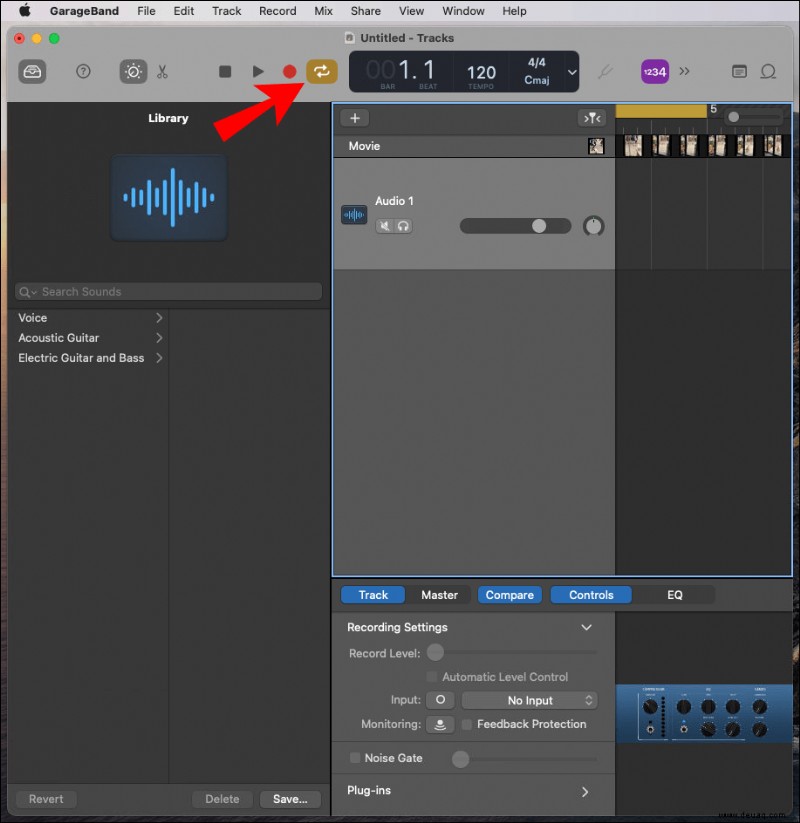 Hover your mouse over the yellow highlight shown on the left end of the numbered line.
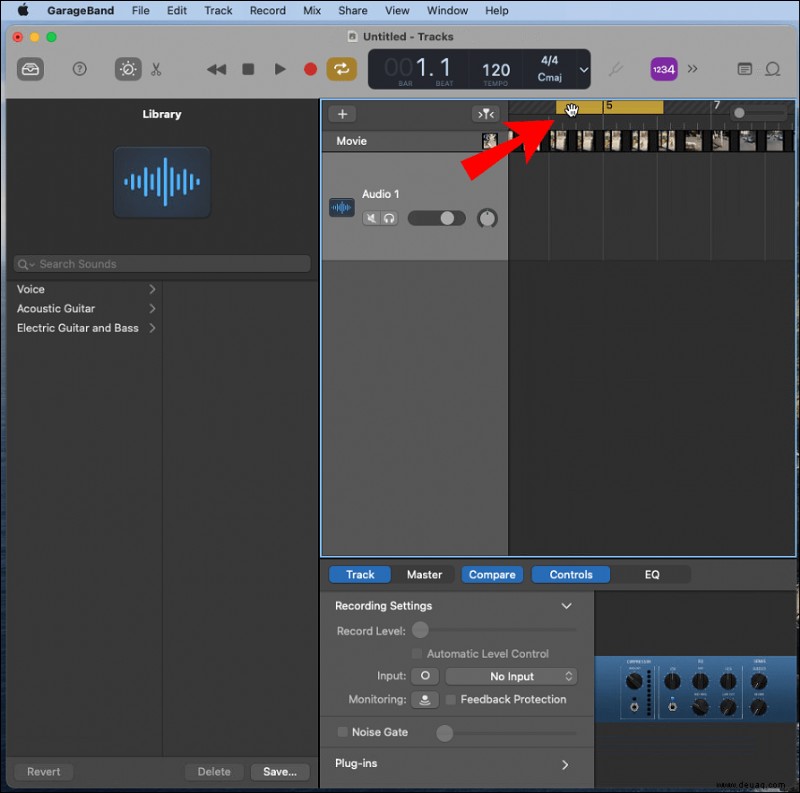 To set your ringtone’s start point, move the arrow right or left accordingly; repeat on the right end to fix its endpoint.
 - Android ringtones generally run in 30-second or shorter loops. The start and end cycle points are highlighted in yellow.
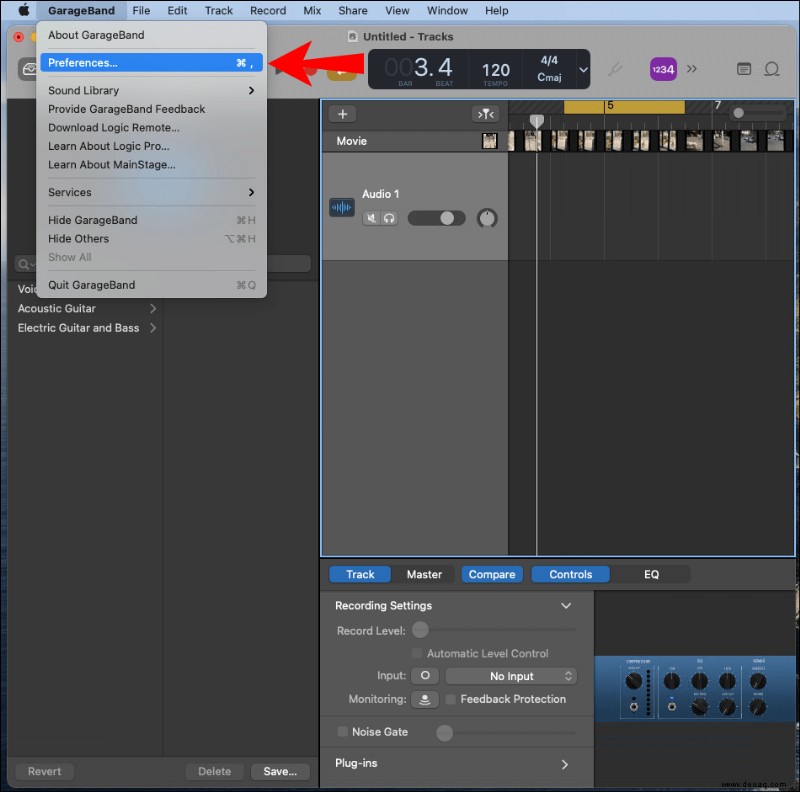
From the menu, click on “GarageBand” and “Preferences.”
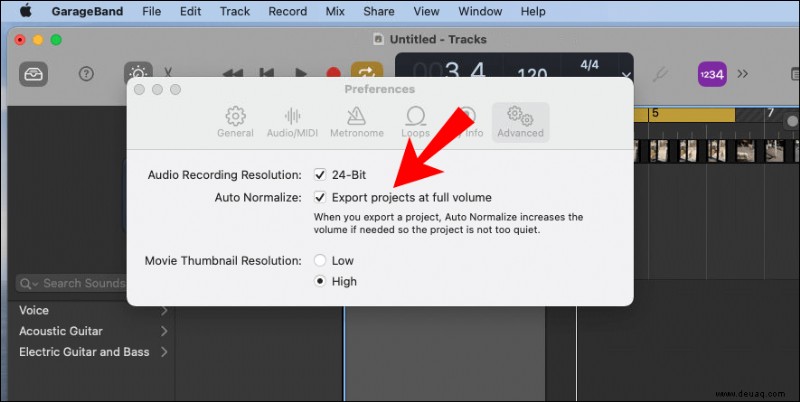
 Select “Advanced” and ensure the box next to “Auto Normalize” is enabled.
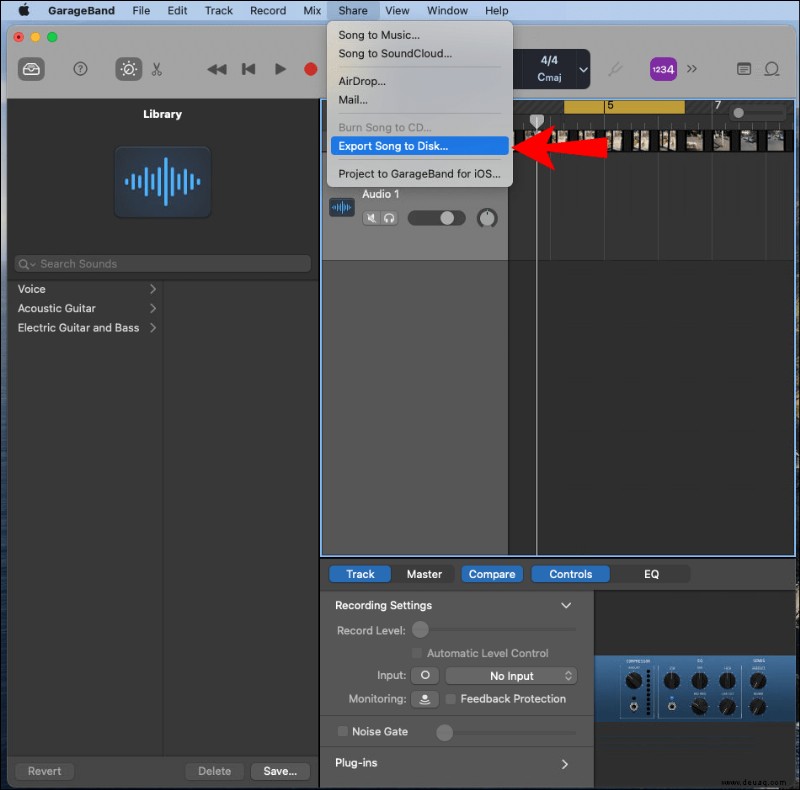
 Once you’re happy with your ringtone, from the menu, select “Share”> “Export Song to Disk.”
 From the pop-up select, a name, file format, save location, and quality.
To finish, select “Export.”
Then to transfer your ringtone to your phone:
Connect your phone to your computer using a USB cable.
Once your computer picks up your phone, navigate to your phone’s internal storage.
Access your “Ringtones” folder, if there isn’t a dedicated ringtones folder you’ll need to create one.
Save your newly created ringtone to the “Ringtones” folder on your phone.
Hinweis :Alternatively, you could upload your ringtone to a cloud-based account if you have one like OneDrive or Google Drive, then download it to your Android device.
Then to set your new ringtone for your contacts:
Access “Contacts” on your phone.
Select the contact you want to set the ringtone for.
At the top-right corner, click on the three-dotted menu icon.
Then select “Set ringtone.”
Click on your new ringtone added to your “Ringtones” folder.
Click on “Save” or “OK.”
Zusätzliche FAQs
How to Set a Song as My WhatsApp Ringtone?
You can use software to create a ringtone from your song; for detailed steps on how to do that, check out the AVCWare Ringtone Maker (Windows) and GarageBand (macOS) sections discussed earlier in this article.
Once you have your new ringtone saved to your phone, set it as default for WhatsApp notifications:
1. Launch WhatsApp.
2. Tap on the three-dotted menu at the top-right.
3. Select “Notifications”> “Notifications tone.”
4. From “Choose an Action,” select “Media Storage.”
5. Select your custom ringtone to set it as default.
Then to set your custom ringtone as default for WhatsApp calls:
1. From the “Notifications” screen, select “Ringtone” under the “Calls” section.
2. From “Choose an Action,” select “Media Storage.”
3. Select your custom ringtone to set it as default.
Exclusive Android Ringtones
Setting customized ringtones for your calls and notifications acts as confirmation when you receive a message, or when it rings- you’ll identify the caller immediately. There is plenty of ringtone creation software available today to assist you with turning your favorite audio or video clip into a ringtone you’ll be proud of.
Now that you’ve seen how straightforward it is to create a ringtone for your Android device, how did you find the process – we’re you able to produce exactly what you wanted? Tell us about the most head-turning ringtone you’ve created in the comments section below.


